Showing posts with label in. Show all posts

Thursday, 29 October 2015

How to open Adfly, Linkbucks in India - Bypass Adfly, Linkbucks

Try to change your DNS server addresses.

  • Go to Network sign on taskbar near time.
  • Right on it. and open "Open Network and Sharing Center".
  • Now click Ethernet or whatever is written after Connection:______
  • Now Click properties
  • Now scroll down to IPv4 and double click it
  • now enter the following information in it by enabling the option use fooling DNS server address.
  • Enter preferred DNS server: 8.8.8.8
  • Enter alternate DNS server: 8.8.4.4
Now Open your websites with https://_____
like Https://adf.ly

Also you can open any adf.ly short link...

For Video Tutorial : Click Here
Read more ...

Saturday, 23 March 2013

How to Open Youtube in Pakistan


How to Open YouTube in Pakistan Fastest Proxy Site:

here i am going to share a fastest proxy site for opening youtube in pakistan. follow the step and open youtube without loosing your speed fast browse and fast downlads.


Step 1:    Open This Proxy Site HiLoad.org


Click on YouTube icon and you have done..

Read more ...

Friday, 1 February 2013

HIDE DATA FOLDER IN MOBILE WITHOUT ANY SOFTWARE


JUST FOLLOW SIMPLE STEPS
1. Create any new folder or you can use any existing folder that is to be hidden.
2. Rename the folder to any name but with the extension of .jad like if I want to hide my images folder then I will name it as IMG.jad
3. Now create a new folder with the same name in the same directory but with the extension of .jar So, I would create the folder with the name IMG.jar
4. And thats it!! My orignal images folder which has been renamed with .jad gets hidden and only folder with.jar extension is visible which is empty.So,my data is protected/hidden from unwanted eyes.

Note :This trick can be used for any JAVA phone from Nokia,Samsung,Motorola,LG or any other company.
To unhide the orignal folder you have to remove the .jar extension from the new folder and your orignal folder with all the files and with .jad will become visible.
Read more ...

Monday, 19 November 2012

Hide File in Picture


In order to accomplish this task, you will need to have either WinZip or WinRAR installed on your computer. You can download either of these two off the Internet and use them without having to pay anything. Here are the steps for creating your hidden stash:
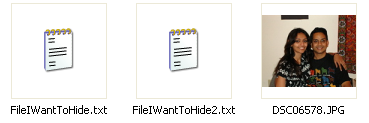
  • Create a folder on your hard drive, i.e. C:\Test and put in all of the files that you want to hide into that folder. Also, place the image that you will be using to hide the files in.
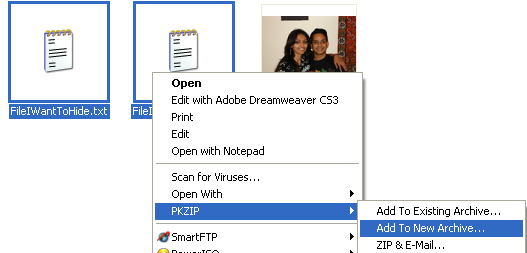
  • Now select all of the files that you want to hide, right-click on them, and choose the option to add them to a compressed ZIP or RAR file. Only select the files you want to hide, not the picture. Name it whatever you want, i,e. “Hidden.rar”.
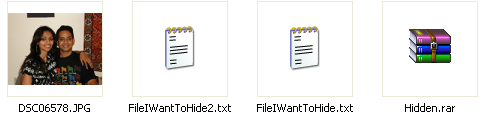
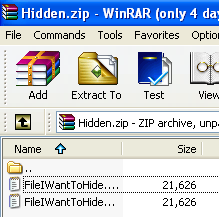
  • Now you should have a folder that looks something like this with files, a JPG image, and a compressed archive:
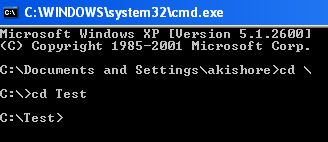
  • Now here’s the fun part! Click on Start, and then click on Run. Type in “CMD” without the quotes and press Enter. You should now see the command prompt window open. Type in “CD \” to get to the root directory. Then type CD and the directory name that you created, i.e. “CD Test“.
  • Now type in the following line: “copy /b DSC06578.JPG + Hidden.rar DSC06578.jpg” and press Enter. Do not use the quotes. You should get a response like below:
Just make sure that you check the file extension on the compressed file, whether it is .ZIP or .RAR as you have to type out the entire file name with extension in the command. I have heard that some people say that they have had problems doing this with a .ZIP extension, so if that doesn’t work, make sure to compress to a .RAR file.
And that’s it! The picture file will have been updated with the compressed archive inside! You can actually check the file size of the picture and see that it has increased by the same amount as the size of the archive.
You can access your hidden file in two ways. Firstly, simply change the extension to .RAR and open the file using WinRAR. Secondly, you can just right-click on the JPGimage and choose Open With and then scroll down to WinRAR. Either way, you’ll see your hidden files show up that you can then extract out.
That’s it! That is all it takes to hide files inside JPG picture files! It’s a great way simply because not many people know it’s possible and no one even thinks about a picture as having to the ability to “hide” files. Enjoy!
Read more ...

Sunday, 18 November 2012

Trick to Hide folders in Nokia/java phones without using any software

Hii friends.....I hope you all are fine. Sometimes we have some personal data in our phone and we want to hide it without using any software. So today am going to share a very useful trick "Hide folders in NOKIA/Java Phones without using any software". This trick will work on LG,NOKIA,SAMSUNG and most of the companies. The only requirement is your phone should support JAVA which almost all mobile phones support now.


Steps:   

  • Create any new folder or you can use an existing folder that you want to hide.
  • Now give that folder any name but with the extension of .jad like if I want to hide my games folder then I will give name as games.jad
  • Now you have to create a new folder in the same directory and with the same name but with the extension of .jar 
    Here, I will create a new folder with the name games.jar
  • Yippee!!You are done!! The original games folder has been hidden and now the folder visible is games.jar which is an empty folder. To view games folder that is to see our protected data,we need to remove the .jar extension from the games.jar and my original folder with my protected files and .jad extension will be visible. 
So, now we have learnt to save our personal data from unwanted eyes!!!

I hope my article was useful to you!!!
Please do comments on this post!!!
Keep Visiting!!!
Read more ...

Saturday, 17 November 2012

How to Hack / Crack a WiFi Network In Windows ?


Hi all users I think many Windows users here are struggling to hack WiFi networks because most of the tutorials are based on BackTrack and other Linux Tools . So today I'm here for sharing a method to Crack WiFi networks using WEP security protocol .The WEP is a very vuarable to attacks and can be cracked easily .

It takes about 5-6 hours if the password is weak a high signal of the WiFi network you are going to hack and you have sometimes 10-12 for more complicated passwords and if the WiFi signal of the Network is weak .The time taken also changes if the WiFi network you are going to hack has many other clients already accessing it . 
You will be using two tools :
1. Commview for WiFi : You will use this tool for capturing the packets sent and recieved through the Access Point you are going to hack .The more packets you capture the better chances of cracking the password .You will need more than 1,00,000 minium packets to crack the password .The packets will be captured in the .ncp format .You will use this tool to convert the .ncp to .cap .

Note :- Some WiFi cards are supported by Commview only in Windows 7 so i suggest you install Win 7 in your Virtual Machine if your card isn't supported .
2. Aircrack-Ng GUI : You will use this tool to crack the password of the Access Point using the . Cap files you obtained from the Commview application .

Note :- You need to run this as administrator .I have provided links for both the software below .
Download Links :

These are the links to the official website of the tools . Some Anti Viruses might detect Aircrack as a virus . It is a false positive .

1.Aircrack-NG GUI

Get it from here

2.Commview for Wifi

Get it from here
Now Get Ready to Crack :
Step 1 : Install CommView for WiFi . It doesnt matter whether you install it in VoIP mode or Standard mode . I used VoIP . It automatically installs the necessary drivers . Allow it to install .

Note :- You will not be able to connect to any Network using WiFi when using CommView .

Step 2 : Click on the PLAY ICON in the Left First .
Step 3 : (Choosing the Network (a) ) : A new window should pop up now. Click on the START SCANNING button .
Step 4 : (Choosing the Network (b) ) : Click on the WiFi network you want to hack in the Right Coulumn and Click on CAPTURE.

Note :- This tutorial is only for WEP protected networks .

Step 5 : (Capturing the Packets) : The windows should close now and you should see that CommView has started Capturing Packets .
 
Step 6 : (Saving the Packets ) : Now that the Packets are getting captured you need to Save them. Click on Settings->Options->Memory Usage Change Maximum Packets in buffer to 20000.
 
Click on the LOGGING Tab .
Check AUTO-SAVING
In the Maximum Directory Size : 5000
Average Log File Size : 50

Now CommView will automatically Start Saving packets in the .ncp format at a size of 20MB each in the specified directory .
Step 7 : ( Concatenating the Logs ) : Since you are capturing a lot of logs you will need to concatenate them into once file . To do this go to Logging and click on CONCATENATE LOGS Choose all the files that have been saved in your specified folder and Concatenate them .

Now you will have one .ncf file .
Step 8 : (Converting .ncf to .cap ) : Now that you have one file with all the packets you need to Convert it into .cap file for AIRCRACK to crack .

Click on File->Log Viewer->Load Commview Logs-> Choose the .ncf file. Now File->Export->Wireshark/TCP dump format .

Aircrack Part :

Now for the Second Part Cracking this is very simple . Just open the Aircrack Folder->Bin->Aircrack-ng GUI.exe Choose the .cap file and you should be able to do the others .
If you have any questions or having problems post a thread il reply . This is a simple tutorial . There is more advance using the rules and stuff but I havnt used it yet . This worked for me . Hope you found it useful . Took a lot of time . Please leave your feedback.
Enjoy.......
Read more ...

Wednesday, 14 November 2012

How to Insert Any Image in Facebook Chat Box?


Although the use of Facebook has expanded over the globe but there is merely any improvement in the Facebook Chatting experience. Facebook Provides its users with a limited number of smileys . Most of the users of Facebook are bored with this limitation and want to use new smileys to represent there emotion on Facebook Chatting. 


Dont worry , here is the solution.
We would Now learn to insert our own Picutures /images present in our computer and send them over in our Facebook chat box to our Friends.
Using this trick you could also share images with your friends personally rather them uploading them publicly on Facebook.


Users like me and you want to play with cool stuff that others dont know and get an upper edge,Express your emotions loudly on Facebook by just following the simple steps:-

1.Just click here to go to the chat maker
2. Choose the file which you want to send over in Facebook Chat by clicking on the Browse option.


3.Click on Upload Now .
4. You would Now see a chat code.


Just copy this code(by clicking on Copy to Clipboard) and paste it in your chat box.

NOTE: You may have to like the Facebook Fan Page of Smileyti.me to see this code.
Done.

Check Out the the result which i got when i used this Trick to share Images.

Read more ...
Friday, 26 October 2012

How To Stole Password In Google Chrome


Hello Guys,
Today I Will Give You One Trick For Stole Password In Google Chrome Using Simple Trick.

We All Mostly Use Google Chrome As Browser In Our Computer And Laptop Because We Mostly Need Fast And Secure Browsing In This Generation Because At Right Now There Are Many Black Hat Hackers They Can Stole Our Cookies And They Can Use It In Other Purpose. So We All Need Secure Browsing Then  Google Give Us Google Chrome From There Products With Free. 

Sometime We Need passwords Of Our Professors In College Or School For Stole There's Data Like Our Question Papers And ETC. Or We Need Passwords In Our Office Or Company For Stole There Data Or ETC(But This Is Not Good BUT. . .lolzzz. .) So For This We Can Use Trick And Also When We Forget Any passwords Or Id The We Can Recover By This Trick.

So Let's Start,
We Have Best Tutorial For This Trick 
Okk Then Let's Start This Tutorial,
See All Steps If You Have Any problems Then See Video.

Step 1:- Open Your Google Chrome Browser.

Step 2:- Find This Symbol (Right Side In Address Bar) And Click On It.

Step 3:- Click On Setting And then You will See The One Window Like Below.


Step 4:- In This Window Go Down You Will See On Bar Like This. Click On It.


Step 5:- Find One Bar Like Below.


Step 6:- Click On "Manage saved passwords" You Will See One Window Like Below


Step 7:- You Got It. . . Now You Can See AnyOne's save Password Threw "Show" Key Which Is Here See Below Bar


I Personally Recommend You For Use Google Chrome As A Default Browser Because They Have Many Good Features And Secure From Hackers. 

. . .That's All. . .

“Do not misuse this hack or attack in any illegal activities this is Only for educational purpose only"
Read more ...

Thursday, 25 October 2012

How To Show Only Online Friends In Facebook Chat


How To Show Only Online Friends In Facebook Chat

. New Facebook chat window shows the both online and offline friends in single window and you have to scroll down to see all online friends or search for the specific friend from the search area.
If you are irritated with this chat box and wants to remove it to show only online friends then install Facebook Chat Fix Google chrome extension in chrome browser.
Along with removing all offline friends from the list, It will also remove the Live News Ticker box from your Facebook.
This works only on Google chrome and for Mozilla Firefox and Internet Explorer read article How to Get Old Facebook Chat Box Back.

It is a simple extension which will revert your new Facebook chat box back to old chat box.
It is Google chrome extension so you don’t have to like any page and install any application before using this extension and you don’t have to grant permissions from your data to install this extension.

Click Here to Download the Extension
Read more ...

Sunday, 21 October 2012

How To Bypass Captcha Verification In Chrome, Firefox Automatically


Some web services uses Captcha image verification to restrict entry to bots for improving the security and automated registrations. But sometimes these captcha codes become hard to read even by humans and becomes more time consuming activity.
Rumola, a new browser addon, will be helpful in this situation which lets you bypass captcha verification and automatically fills the captcha codes in websites.
How to Bypass Captcha verification using Rumola
Open an account at Rumola. (you’ll get 10 free trials at registration)
Install the addon required for your browser.

After installing the addon, restart your browser if required and once the plugin is activated, it will automatically start filling captchas for you.

 Below screenshot shows Rumola in action bypassing captcha input from user.

How to skip captcha: Once you start to fill other fields or double click captcha field, Rumola will initiate captcha recognition and read the numbers & letters and puts them in the box for you.
Read more ...

Saturday, 15 September 2012

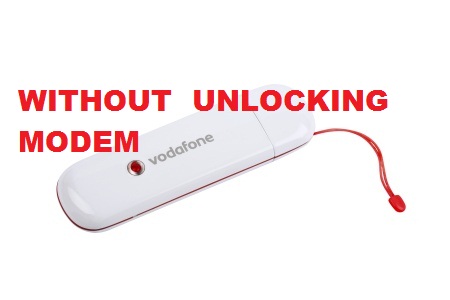
Use any sim in any modem without unlocking it


We all know that, we cannot use any sim in any modem without unlocking the modem. But its now possible by using Nokia PC suite…


Follow the Steps :

1) Insert the sim inside the modem and connect it to the PC.

2) It will display the message as invalid sim, ignore that message and Open the Nokia PC suite.

3) Click on Connect to Internet option in PC suite.

4) Goto Configure. Select your data card modem,and make all operator apn setting as like when we use nokia mobile connection.

5) Finish the set up and connect to internet through PC suite.

6) Now your net is connected without any unlocking….

Enjoy…
Read more ...

Hide files in JPG files


Watch the Video...


Hide files in JPG files 
Read more ...

Saturday, 1 September 2012

Enable Task Manager disabled by Administrator or Virus in Windows


Windows Task Manager is used to view details about processes running on your computer. Since it can be used to terminate programs that are misbehaving or are viruses disguised in the form of harmless programs, most spyware and viruses disable it to prevent themselves from being closed through it. Some administrators also disable Task Manager to prevent users from closing important security programs like antiviruses and anti-malwares.

In such situations, running the Task Manager will give the "Task Manager has been disabled by Administrator" error. However, there are some techniques you can use to re-enable task manager and close those harmful programs manually. This article contains few such simple techniques you can use to regain access to Task Managing privileges.


Create a Registry(.reg) file for enabling Task Manager

If you are unfamiliar with manually editing the Registry, you can create a Registry file which will automatically modify the Registry Key to re-enable Task Managing. To create one such file:-
Open Notepad or any other text editor.
Copy the code given below and paste it as it is in it.


Windows Registry Editor Version 5.00 [HKEY_CURRENT_USER\Software\Microsoft\Windows\ CurrentVersion\Policies\System] “DisableTaskMgr”  =dword:00000000

Save the file as Enable Task Manager.reg or *.reg.

Open the file by double clicking on it.

Registry Editor will ask you for confirmation. In the confirmation Window, click Yes.
Task Manager would immediately be accessible. If it is not, restart your computer.

Read more ...
Related Posts Plugin for WordPress, Blogger...